
-
HonoluluGirl
- Senior Member
- Posts: 129
- Joined: Fri Mar 02, 2012 7:01 pm
- Location: Hawaii

the real question is what HAVENT you tried? plastic cups, dixie cups, yes handrolled newspaper (I'm awful clumsy and impatient for those) butter tubs, milk cartons. You name it!
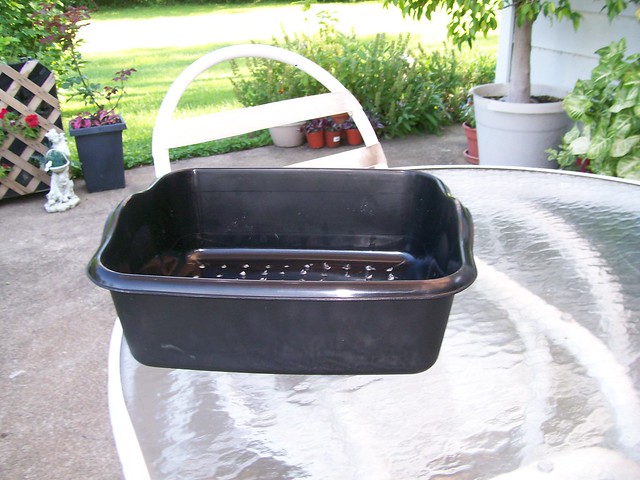
Heres one of my ultimate favs. dishtub from the dollar store. I normally start cuttings in these, but yes some seeds too. These are great cuz you can stack 5+ and drill the drainage holes all at once. zip zip zip DONE!
I'm experimenting with another recyclable idea to keep flats evenly moist. Whatever kind you use! Must admit my hatred for watering, especially inside. But the little guys need it... Have you ever seen those burpee raised self watering flats? I was skeptical myself until one was given to me.

This thing is KICKING BUTT. I filled the tray once, the water lasted over a week and the plants are getting exactly the right amount of EVEN water distribution.
BUT theyre $20 bones online. ouch.
Of course, I immediately started doing research. And came up with a homemade version. Still testing, but it looks like it might just cut the mustard.

Heres another
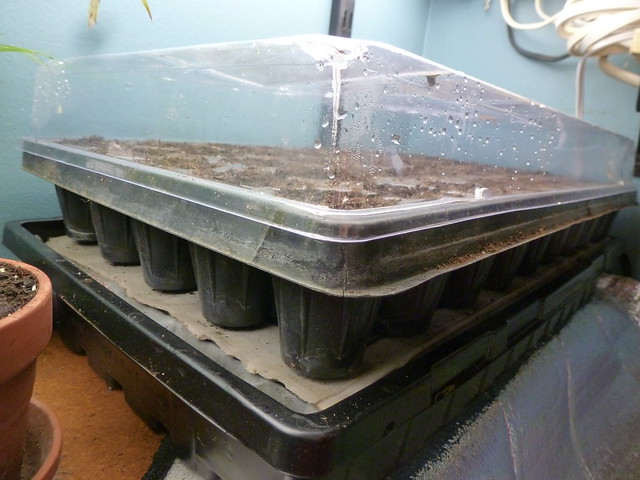
That's newspaper in there serving as a 'capillary mat' or 'wick' (what CANT you use newspaper for!) Based on this research... https://www.ag.auburn.edu/adm/comm/news/ ... cycled.htm Also suggested, towels, felt, batting... I'm cheering for newspaper because it absorbs any added fertilizer and you can throw it in your garden or the compost bin when youre done.
Heres one of my ultimate favs. dishtub from the dollar store. I normally start cuttings in these, but yes some seeds too. These are great cuz you can stack 5+ and drill the drainage holes all at once. zip zip zip DONE!
I'm experimenting with another recyclable idea to keep flats evenly moist. Whatever kind you use! Must admit my hatred for watering, especially inside. But the little guys need it... Have you ever seen those burpee raised self watering flats? I was skeptical myself until one was given to me.
This thing is KICKING BUTT. I filled the tray once, the water lasted over a week and the plants are getting exactly the right amount of EVEN water distribution.
BUT theyre $20 bones online. ouch.
Of course, I immediately started doing research. And came up with a homemade version. Still testing, but it looks like it might just cut the mustard.
Heres another
That's newspaper in there serving as a 'capillary mat' or 'wick' (what CANT you use newspaper for!) Based on this research... https://www.ag.auburn.edu/adm/comm/news/ ... cycled.htm Also suggested, towels, felt, batting... I'm cheering for newspaper because it absorbs any added fertilizer and you can throw it in your garden or the compost bin when youre done.
-
DoubleDogFarm
- Super Green Thumb
- Posts: 6113
- Joined: Sun Mar 28, 2010 11:43 pm
All good ideas Trisha. Really like the capillary experiment.
Here is my watering shelf project Feb 2011. Hope to make it two tier by this February.
https://www.helpfulgardener.com/forum/v ... hp?t=32523
Eric
Here is my watering shelf project Feb 2011. Hope to make it two tier by this February.
https://www.helpfulgardener.com/forum/v ... hp?t=32523
Eric
Double Dog Farm: WOW! That is elaborate AND fantastic!!! That gives me ideas for outdoor watering. Many of our shrubs don't like overhead watering and those 1/4" lines to each pot is TOO much (effort, money, headache!) This looks like a fabulous system. Thanks for sharing it with us!
applestar: I just used 2x4s with a piece of superthick cardboard cut to size. Whatever I had in the garage. Probably would be better off with plywood, but its cold to be cutting anything hahaa. I made a video if you wanna see it.
applestar: I just used 2x4s with a piece of superthick cardboard cut to size. Whatever I had in the garage. Probably would be better off with plywood, but its cold to be cutting anything hahaa. I made a video if you wanna see it.
Last edited by Trisha on Fri Dec 28, 2012 4:35 pm, edited 2 times in total.
-
DoubleDogFarm
- Super Green Thumb
- Posts: 6113
- Joined: Sun Mar 28, 2010 11:43 pm
hahah great! You guys are quick on this board 
I went through lot about potting soil, which you guys probably already know but I put one test tray together on camera... Simple simple stuff and it seems to be working. https://youtu.be/_-q15vi4oa8
Tell me if I'm wrong about anything, or if I can do something better (like get a tripod!)
I went through lot about potting soil, which you guys probably already know but I put one test tray together on camera... Simple simple stuff and it seems to be working. https://youtu.be/_-q15vi4oa8
Tell me if I'm wrong about anything, or if I can do something better (like get a tripod!)
-
ElizabethB

- Super Green Thumb
- Posts: 2105
- Joined: Sat Nov 24, 2012 12:53 am
- Location: Lafayette, LA
-
applestar

- Mod
- Posts: 30588
- Joined: Thu May 01, 2008 7:21 pm
- Location: Zone 6, NJ (3/M)4/E ~ 10/M(11/B)
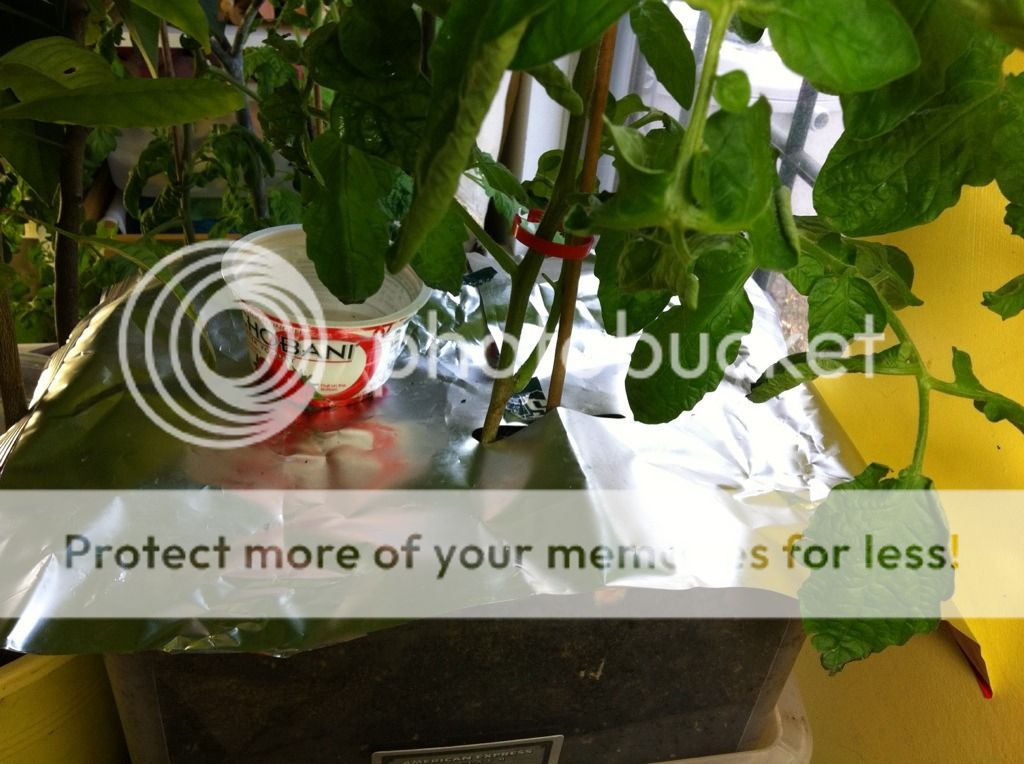
I was just cutting a few open -- cut off top and bottom seams, then cut down the back either along center of the heat fused seam or along one side.applestar wrote:This isn't a container but I should mention recycling the inside of chip bags for reflective material around, under, and above the seedlings:
https://www.helpfulgardener.com/forum/v ... p?p=112334
Here is a photo of the ones I just cut open -- they usually come shiny silver or pearlescent white. Both excellent reflectors.
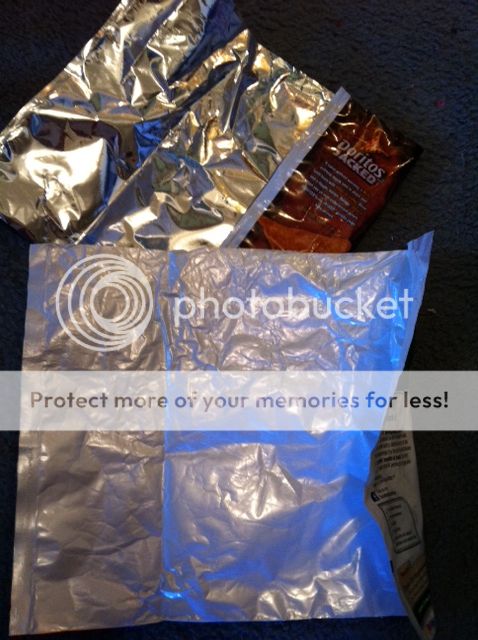
I use them to line the shelf as well as walls around the plants. I'm also starting to make container soil mulch/cover to reflect light up. many of my plants are starting to suffer from insufficient light in the lower foliage since the canopy blocks all the light.
-
ReptileAddiction

- Greener Thumb
- Posts: 866
- Joined: Sun Jun 17, 2012 12:52 am
- Location: Southern California
-
ElizabethB
- Super Green Thumb
- Posts: 2105
- Joined: Sat Nov 24, 2012 12:53 am
- Location: Lafayette, LA
applestar, love the potato chip bag idea, now THATS recycling!
ElizabethB, glad you liked the video! the newspaper wick is still doing really well, I'm growing more confident this is the way to go. If you make one (hope I'm not too late) use something sturdy to hold your cells. As thick as that cardboard was, I knew it would melt before long, but I thought it would last longer than a week. go for plywood, metal or super thick plastic. Good luck! Keep us updated.
ElizabethB, glad you liked the video! the newspaper wick is still doing really well, I'm growing more confident this is the way to go. If you make one (hope I'm not too late) use something sturdy to hold your cells. As thick as that cardboard was, I knew it would melt before long, but I thought it would last longer than a week. go for plywood, metal or super thick plastic. Good luck! Keep us updated.
Great ideas.
I also used old styrofoam coolers, if you go to restaurants and fish markets the fish come in styrofoam coolers that make the perfect window boxes. I did the origami pots and made pots with pot maker. They were ok but they were soft and I kept mine too wet so they did not work out to well. I have used egg cartons for seedlings. I have even seen, potted eggshells. I use tofu containers for seed starting, just the right depth for me and the rectangular pots do fit nicely together. I have also used old bleach, vinegar and soy sauce bottles for hanging baskets and the microwavable take out containers also work and come with their own mini greenhouse covers. I have also used styrofoam coffee cups. I don't have much luck with clear containers, the algae grows but not the plants. I have used some of the swiffer containers for seeds and cuttings. I used soda cups as supports for my homemade self watering container, but they did not work as well for seedlings. I have even used old pots, wash basins (from the hospital), and bowls. Clean out the foil roasting pans after a party (keep the best ones to use again), and use that for planting. I tried using old vertical blinds as dividers. I thought it would be easier to take out a slice with less transplant shock, but the seedlings did not come out as easily as I thought it would. I've used yogut cups (safeway kind), and save popsicle sticks and chopsticks when you are done. The popsicle makes good labels with a marking pen and chopsticks a small stake.
I also used old styrofoam coolers, if you go to restaurants and fish markets the fish come in styrofoam coolers that make the perfect window boxes. I did the origami pots and made pots with pot maker. They were ok but they were soft and I kept mine too wet so they did not work out to well. I have used egg cartons for seedlings. I have even seen, potted eggshells. I use tofu containers for seed starting, just the right depth for me and the rectangular pots do fit nicely together. I have also used old bleach, vinegar and soy sauce bottles for hanging baskets and the microwavable take out containers also work and come with their own mini greenhouse covers. I have also used styrofoam coffee cups. I don't have much luck with clear containers, the algae grows but not the plants. I have used some of the swiffer containers for seeds and cuttings. I used soda cups as supports for my homemade self watering container, but they did not work as well for seedlings. I have even used old pots, wash basins (from the hospital), and bowls. Clean out the foil roasting pans after a party (keep the best ones to use again), and use that for planting. I tried using old vertical blinds as dividers. I thought it would be easier to take out a slice with less transplant shock, but the seedlings did not come out as easily as I thought it would. I've used yogut cups (safeway kind), and save popsicle sticks and chopsticks when you are done. The popsicle makes good labels with a marking pen and chopsticks a small stake.
-
applestar
- Mod
- Posts: 30588
- Joined: Thu May 01, 2008 7:21 pm
- Location: Zone 6, NJ (3/M)4/E ~ 10/M(11/B)
Fungus Gnat traps --
BASIC IDEA: they are attracted to light -- bright white surfaces seem to work well.
Pint size sour cream tub 1/2 filled with soapy water. I use a dop or two of Rainbow Kids unscented shampoo. The one at the base of a shoplight fixture standing on one end is the most effective one I have.
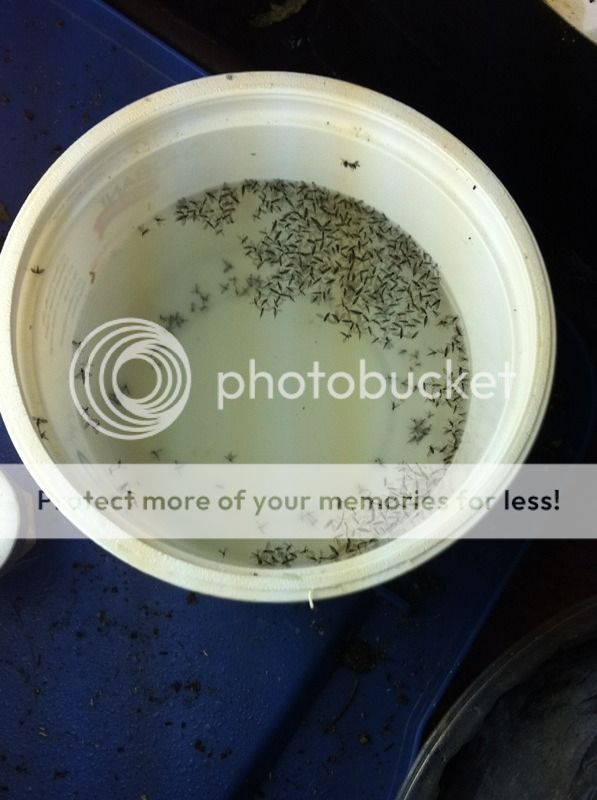
(This is 2 mornings after being refilled just before lights out at night -- yeah I'm having a bad outbreak right now )
)
I also put squat 4 and 6 oz yogurt cups on the surface of the soil.
But for surface of the soil trap, a better trap can be made of translucent pudding cups slathered with grease. This type of cup seems to gather light and sort of shine out. I use UNpetroleum Jelly. Put some on the inside of the cup too.
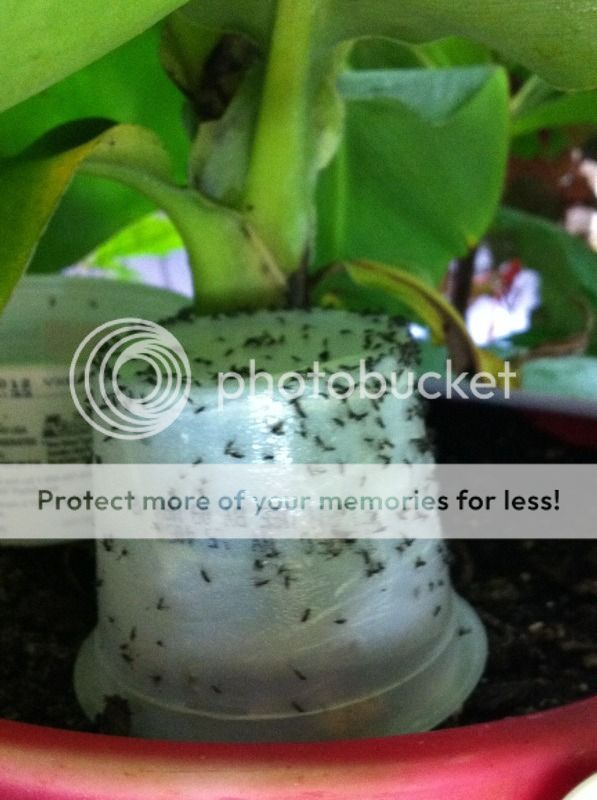
(This was a really bad infestation in an 8-in pot after same time period as above -- approx 32 hrs. )
)
Where larger soil/air space is available and/or larger trap is needed, I would consider using qt. size deli container.
They both seem to lose effectiveness after a couple of days, so clean out/off and recharge.
BASIC IDEA: they are attracted to light -- bright white surfaces seem to work well.
Pint size sour cream tub 1/2 filled with soapy water. I use a dop or two of Rainbow Kids unscented shampoo. The one at the base of a shoplight fixture standing on one end is the most effective one I have.
(This is 2 mornings after being refilled just before lights out at night -- yeah I'm having a bad outbreak right now
I also put squat 4 and 6 oz yogurt cups on the surface of the soil.
But for surface of the soil trap, a better trap can be made of translucent pudding cups slathered with grease. This type of cup seems to gather light and sort of shine out. I use UNpetroleum Jelly. Put some on the inside of the cup too.
(This was a really bad infestation in an 8-in pot after same time period as above -- approx 32 hrs.
Where larger soil/air space is available and/or larger trap is needed, I would consider using qt. size deli container.
They both seem to lose effectiveness after a couple of days, so clean out/off and recharge.
-
Harvester of sorrow
- Full Member
- Posts: 15
- Joined: Fri Jan 11, 2013 12:43 am
- Location: Hopkinsville,KY
post deleted
Last edited by Harvester of sorrow on Tue Jan 22, 2013 12:27 pm, edited 1 time in total.
-
NYGardener
- Newly Registered
- Posts: 1
- Joined: Mon Jan 28, 2013 8:35 pm
- Location: Warwick, NY
I have used all of the above-mentioned methods in my basement, under florescent lights for years. This year I have a mischievous kitten that has been digging in my potted house plants, so I'm debating whether I want to give him more plants to destroy. I may rig up a barrier with clear plastic drop cloths around the bench.
-
applestar
- Mod
- Posts: 30588
- Joined: Thu May 01, 2008 7:21 pm
- Location: Zone 6, NJ (3/M)4/E ~ 10/M(11/B)
Seeds started and/or uppotted from 3/4" microblocks in recycled containers.
-- K-cups are working great for tiny slow growing seedlings like celery and celeriac, and slow growing peppers... even basil to save space for a while though they outgrow them fast:
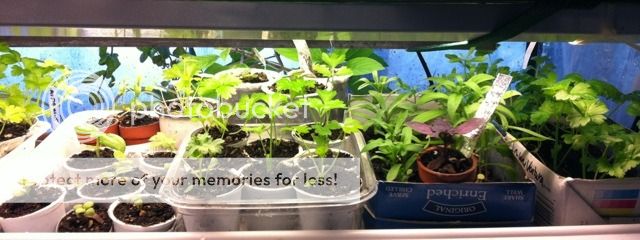
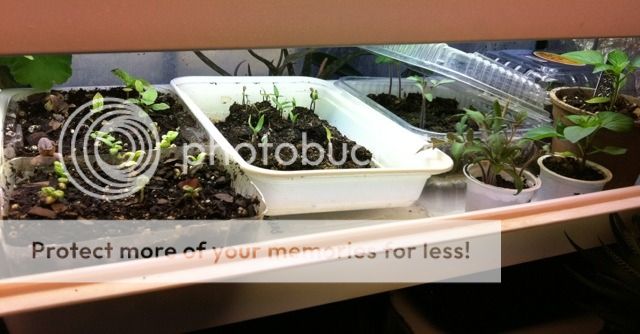
Densely sown Black Cherry tomato seedlings in a K-cup in that bottom picture
-- K-cups are working great for tiny slow growing seedlings like celery and celeriac, and slow growing peppers... even basil to save space for a while though they outgrow them fast:
Densely sown Black Cherry tomato seedlings in a K-cup in that bottom picture
-
gixxerific

- Super Green Thumb
- Posts: 5889
- Joined: Fri Jun 26, 2009 5:42 pm
- Location: Wentzville, MO (Just West oF St. Louis) Zone 5B
I'm using whatever as well as you know.
I saw something the other day, which I have seen before but it is a great idea. They are big rugged cloth bags. Forget the explanation let me hunt down the site.
https://www.growerssupply.com/farm/suppl ... 09731.html
I saw something the other day, which I have seen before but it is a great idea. They are big rugged cloth bags. Forget the explanation let me hunt down the site.
https://www.growerssupply.com/farm/suppl ... 09731.html

-
ReptileAddiction
- Greener Thumb
- Posts: 866
- Joined: Sun Jun 17, 2012 12:52 am
- Location: Southern California
I have this onegixxerific wrote:I'm using whatever as well as you know.
I saw something the other day, which I have seen before but it is a great idea. They are big rugged cloth bags. Forget the explanation let me hunt down the site.
https://www.growerssupply.com/farm/suppl ... 09731.html
https://www.amazon.com/gp/product/B004S0 ... UTF8&psc=1
I used it last season and am using it again this season. My one major complaint is that whenever the surface would be dry (which because the water goes out the sides happens more than usual-another complaint) the water would just flow to the side of the pot and go out the sides of the bag. It took me a while to realize why everything was constantly wilted.

I am a little surprised that I haven't shared my idea for seed starting containers on this thread. Seedlings are started communally and then go into individual cells, in trays (48 to 72/tray). The containers have been about 20 years in the testing testing .
First of all, here is a "lab box" that you can buy for germination and that is used by labs around the world for that purpose:

Now, here is what I use (they come in all sizes):

.
.
. (crumbs)
digitS'
First of all, here is a "lab box" that you can buy for germination and that is used by labs around the world for that purpose:
Now, here is what I use (they come in all sizes):
.
.
. (crumbs)
digitS'
-
ReptileAddiction
- Greener Thumb
- Posts: 866
- Joined: Sun Jun 17, 2012 12:52 am
- Location: Southern California

-
ReptileAddiction
- Greener Thumb
- Posts: 866
- Joined: Sun Jun 17, 2012 12:52 am
- Location: Southern California
That was a "pre" picture, ReptileAddiction. I still hadn't fully prepped that box but wanted to show you how similar they are to what the labs use for germination. Yes, they probably do not use soil.
I find the lids are of help until there are sprouts, then the seedlings in their soil mix go to a south window for a few days. Then, they go out to my greenhouse.
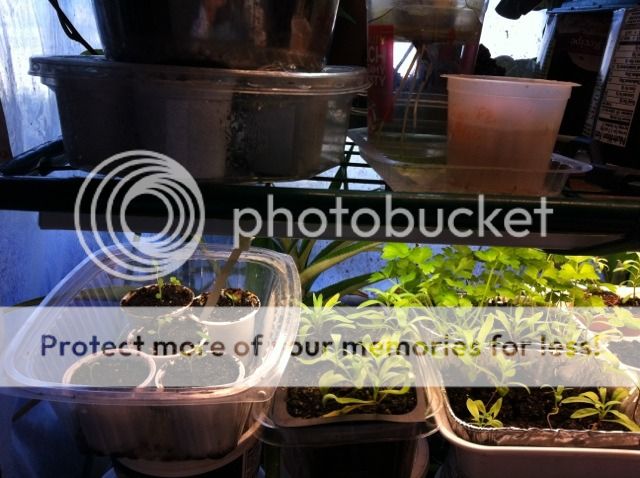
Just today, the last of the tomatoes were moved out of their cookie boxes and into 4-packs, 48 plants to a tray.
Steve
I find the lids are of help until there are sprouts, then the seedlings in their soil mix go to a south window for a few days. Then, they go out to my greenhouse.
Just today, the last of the tomatoes were moved out of their cookie boxes and into 4-packs, 48 plants to a tray.
Steve
-
ReptileAddiction
- Greener Thumb
- Posts: 866
- Joined: Sun Jun 17, 2012 12:52 am
- Location: Southern California
-
Sweetcheeks

- Full Member
- Posts: 16
- Joined: Tue Mar 12, 2013 12:26 pm
- Location: NW Arkansas
A few things about myself:
1. I work in a bar.
2. I am what they call "crafty," and I inherited it from my mother... She's got all the hookups.
3. I love gardening!
Now, when you put all of these things together, my kitchen tends to look a little like this:
Which winds up doing this:
Which gives me an idea! 
I've cut as close to the bottom as possible on some of the bottles, and made some hangers out of old t-shirts to hang them upside down and use as hanging planters!
My collection of bottles has grown a bit, so I've got way more wine and liquor bottles and stopped toting home the beer bottles (much to my boyfriend's relief!)
I've got some Alexandria Alpine Strawberry seedlings going right now, and thought about putting one in each beer bottle and putting some various herbs in the larger wine bottles. I thought about how I'd get the plant out of the bottle without tearing up the root system, and came up with lining the inside with cheesecloth and then filling it up with my potting mix so I'd just have to pull on the cheesecloth and pop it all right out.
Think any of this will work in my favor?
1. I work in a bar.
2. I am what they call "crafty," and I inherited it from my mother... She's got all the hookups.
3. I love gardening!
Now, when you put all of these things together, my kitchen tends to look a little like this:
I've cut as close to the bottom as possible on some of the bottles, and made some hangers out of old t-shirts to hang them upside down and use as hanging planters!
My collection of bottles has grown a bit, so I've got way more wine and liquor bottles and stopped toting home the beer bottles (much to my boyfriend's relief!)
I've got some Alexandria Alpine Strawberry seedlings going right now, and thought about putting one in each beer bottle and putting some various herbs in the larger wine bottles. I thought about how I'd get the plant out of the bottle without tearing up the root system, and came up with lining the inside with cheesecloth and then filling it up with my potting mix so I'd just have to pull on the cheesecloth and pop it all right out.
Think any of this will work in my favor?
-
Sweetcheeks
- Full Member
- Posts: 16
- Joined: Tue Mar 12, 2013 12:26 pm
- Location: NW Arkansas
-
WinglessAngel
- Green Thumb
- Posts: 381
- Joined: Thu Apr 14, 2011 11:51 pm
- Location: NE Ohio
As many have said already, I'm glad to know that I'm not the only one that saves my yogurt pots, sour cream pots etc lol. My patio and deck in and out of garden season ends up looking like a recycling center but they always get used and I always seem to need more! This year I swiped the egg cartons for my small breed tomato seedlings to start the seeds in, the rest are all seeded into yogurt pots and leftover plant pots from the nursery and since I always buy a whole tray of tomato plants at a time (beefsteaks only, as hubby loves them and I can never seem to get them to grow from seed) I save the trays and use those for holders for all the refilled and seeded pots lol. I think I'm going to need to stock up on yogurt our next grocer trip to get more cups lol Then again I might just buy a pack of beer cups (the plastic kind lol)
-
applestar
- Mod
- Posts: 30588
- Joined: Thu May 01, 2008 7:21 pm
- Location: Zone 6, NJ (3/M)4/E ~ 10/M(11/B)
applestar wrote:When I first uppot, I soak each in a pint size tub of water so the water is at least 1/3 of the way up the container for faster absorption. After that I generally bottom water in the tray.
When you use cups that don't sit straight when crowded in the tray, you may need to add more water to the tray. It's a pain, but it's also a good idea to move them around so the ones that sit straight and the ones that are leaning take turns, and really keep an eye on them and "heft test" for ones that are not getting watered enough.
I think the number of holes are enough -- did you put all the holes in the flat-to-the-bottom ring or were some of them in the raised center part that won't touch the bottom?
This year, I realized after watching some blogs (Wintersown is one of them, I have to look up the other but it was a soil blocking blog) that drainage doesnt have to be from circular holes. I have been using a box cutter to make slits on the bottom and sides of the cups and cut-off bottles (slits on the sides go at least 1/2 way up -- for better aeration of the root zone and this prevents circling of the roots according to one blog source).
With these, it's important to water thoroughly. The soil may look moist on the surface and yet the bottom portions could be dry. "Heft Test" is essential. With these, I've found that bottom watering takes forever. I find it better to fill the top of the cup THREE times, letting the water soak in each time.
I use the plastic cups, but it didn't take long to realize that the drainage holes were a pain....literally, I drilled them, used a knife, heated skewer but then like applestar, slit the dang things with a box knife. Oh so easy and seems to work better than the ones I did with round (kinda) drainage holes...
-
applestar
- Mod
- Posts: 30588
- Joined: Thu May 01, 2008 7:21 pm
- Location: Zone 6, NJ (3/M)4/E ~ 10/M(11/B)
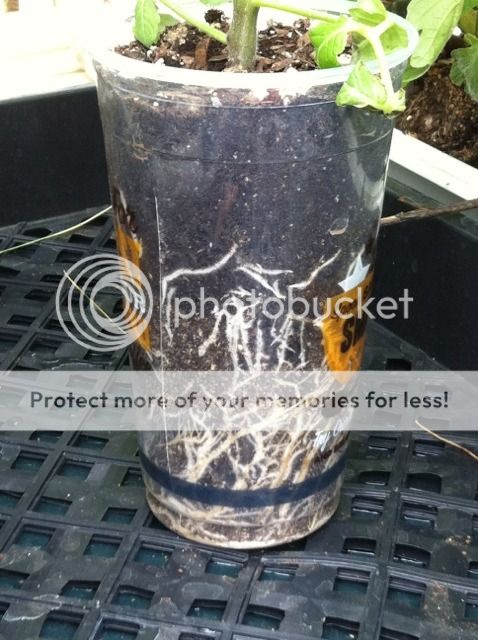
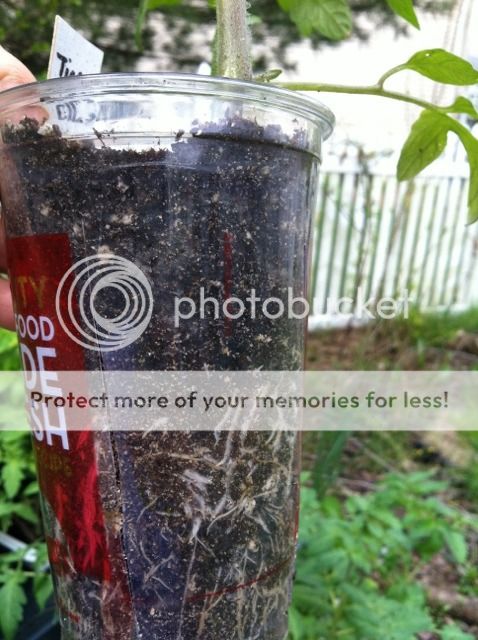
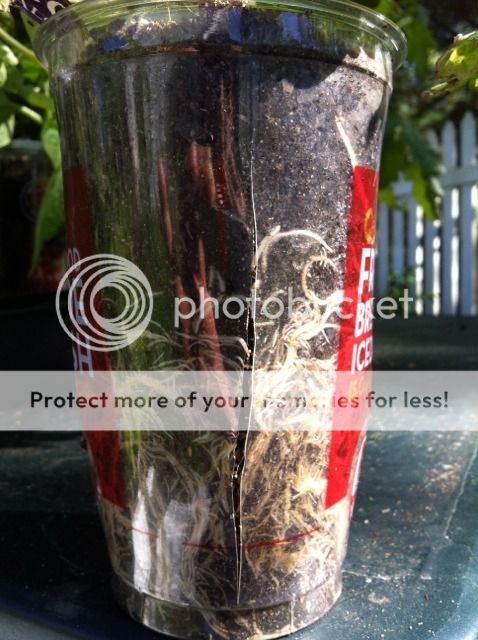
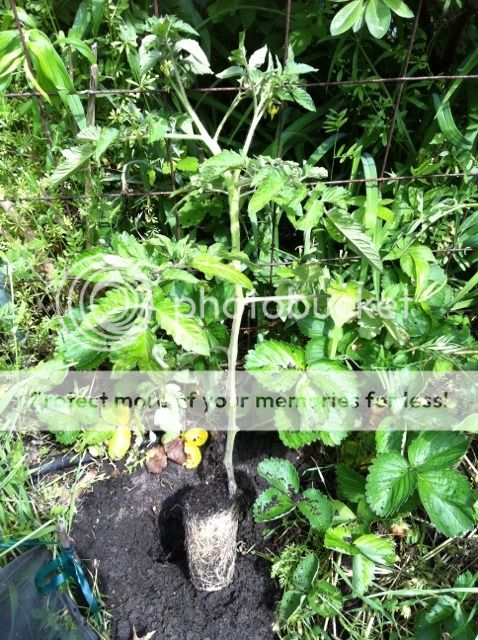
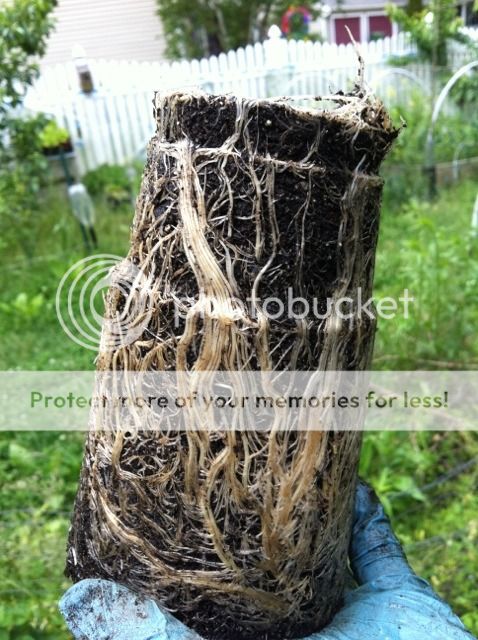
One more update photos of the tall plastic cups and sod bottles with vertical slits.
It's possible for them to get completely root bound
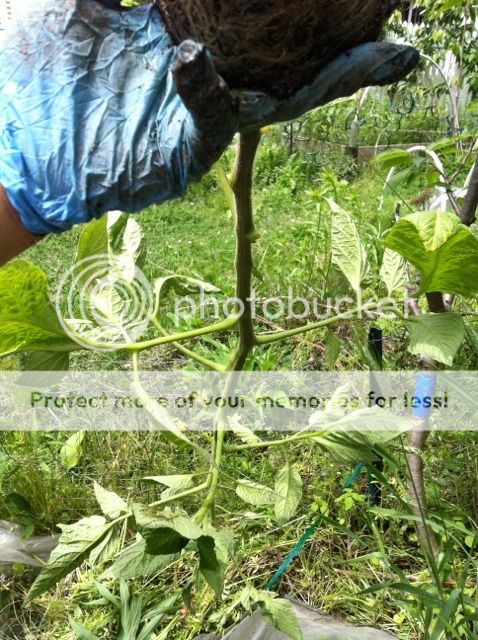
...rest of the plant...
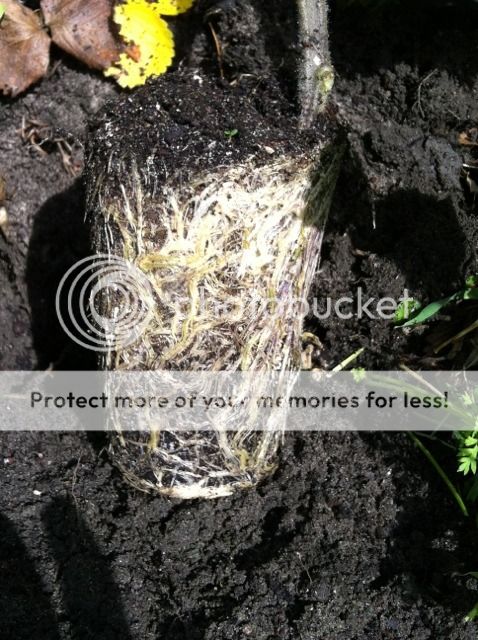
In the following photos, I'm holding the rootball upside down.
I think the roots do tend to grow down rather than around:
...rest of the plant...
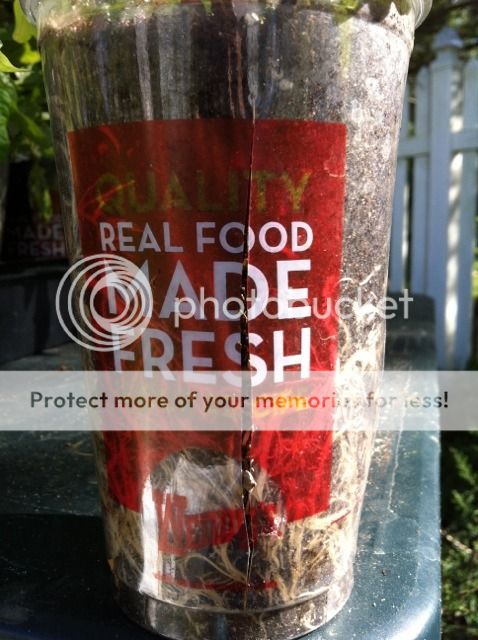
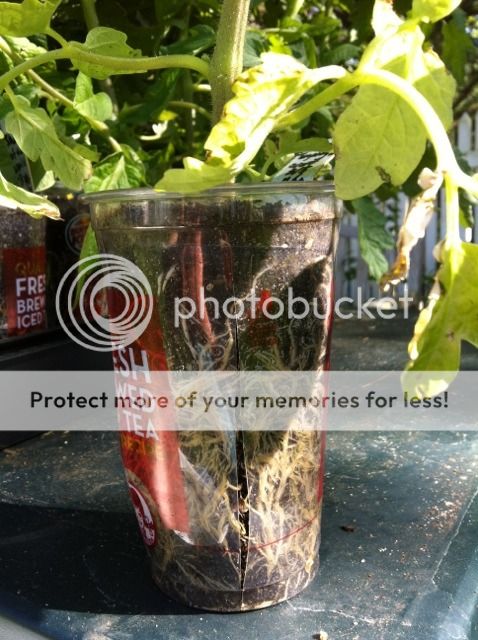
In this photo, you can clearly see where the slits were. They do seem to have affected the direction of root development:
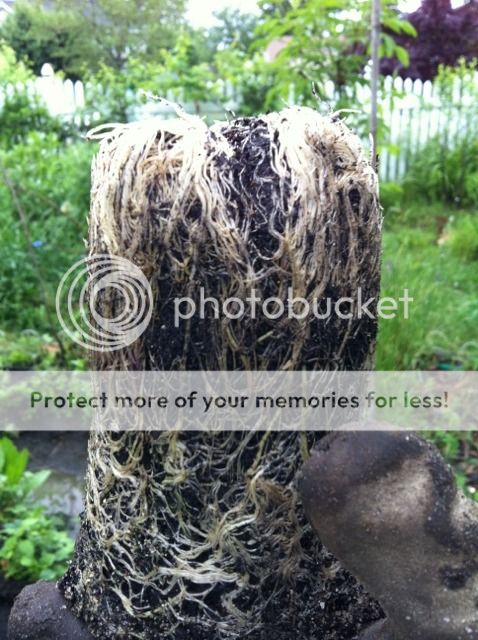
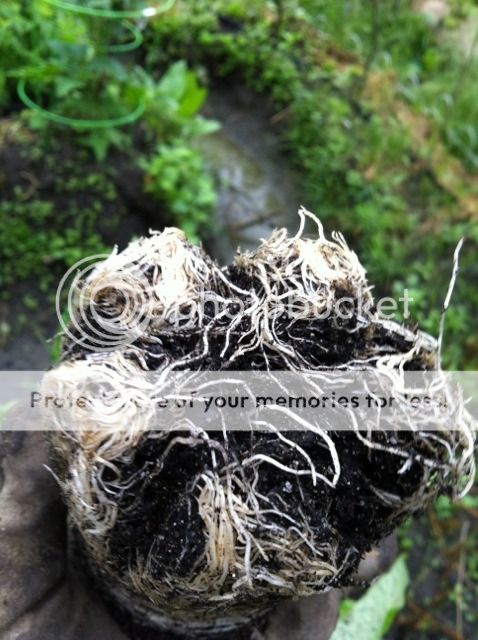
With the cut off soda bottles, the roots grow down following the contour of the bottle. Reminds me of the specialty star shaped cell trays and pots:
It's possible for them to get completely root bound
...rest of the plant...
In the following photos, I'm holding the rootball upside down.
I think the roots do tend to grow down rather than around:
...rest of the plant...
In this photo, you can clearly see where the slits were. They do seem to have affected the direction of root development:
With the cut off soda bottles, the roots grow down following the contour of the bottle. Reminds me of the specialty star shaped cell trays and pots:
-
evtubbergh
- Green Thumb
- Posts: 532
- Joined: Sun Jan 13, 2013 6:52 am
- Location: South Africa
-
phonelady61
- Full Member
- Posts: 41
- Joined: Thu Jun 13, 2013 10:14 am
I use the leftover sundae cups from mcdonalds for seed starting and the lids too . just punch holes in top and bottom and wallah you have a humid environment and seed starting . You can also use the milkshake and the latte ' cups as well .just cover the top hole where the straw goes with tape and then pop two holes on each side of the top . I love to recycle I also use cake left over containers like the kind you get from the bakery to seed start also ....I love to recycle .

I see all these started sets for one container its $6 when there are all kinds of thing to use that are something that you just throw away. One thing I found that I like for a small seed starting container is the container I buy with a whole chicken at Wal Mart of Shop & Save. It is black plastic at the bottom but clear at the top lid. The lid is 6 by 8 by 3.5 inches and the black bottom is is almost 2 inches deep. What is nice is the black absorbs the heat so the seeds start quicker. The clear top will hold the moisture even after the seed starts. I bet I can leave a tomato in this box till it gets sever sets of leaves!
Milk cartons along with many other containers you just pitch! I buy boiled peanuts in a 25 ounce can Wal Mart the can is over 4 inches deep and 3.5 inch round and I plan on using them for up pots! They sell the boiled peanuts all over the south but here in Pa. I can only buy them at Wal Mart for $1.99 a can and they are great still in the shell! How about some container ideas!?
Milk cartons along with many other containers you just pitch! I buy boiled peanuts in a 25 ounce can Wal Mart the can is over 4 inches deep and 3.5 inch round and I plan on using them for up pots! They sell the boiled peanuts all over the south but here in Pa. I can only buy them at Wal Mart for $1.99 a can and they are great still in the shell! How about some container ideas!?